







A stripped thread or a panel with no access behind it can stop a straightforward repair cold. Knowing how to use rivet nuts gives you a reliable threaded fixing from one side of the job, whether you are fitting vehicle accessories, repairing bodywork, building racking or mounting equipment in a workshop.
Rivet nuts, also called rivnuts, nutserts or threaded inserts, look simple but the result depends on accurate sizing. Choose the wrong hole diameter, insert length or setting tool and the rivet nut can spin, sit crooked or fail to clamp properly. Get the basics right and you have a clean, repeatable fixing that saves time compared with welding a nut or trying to hold one in a closed section.
What a rivet nut does
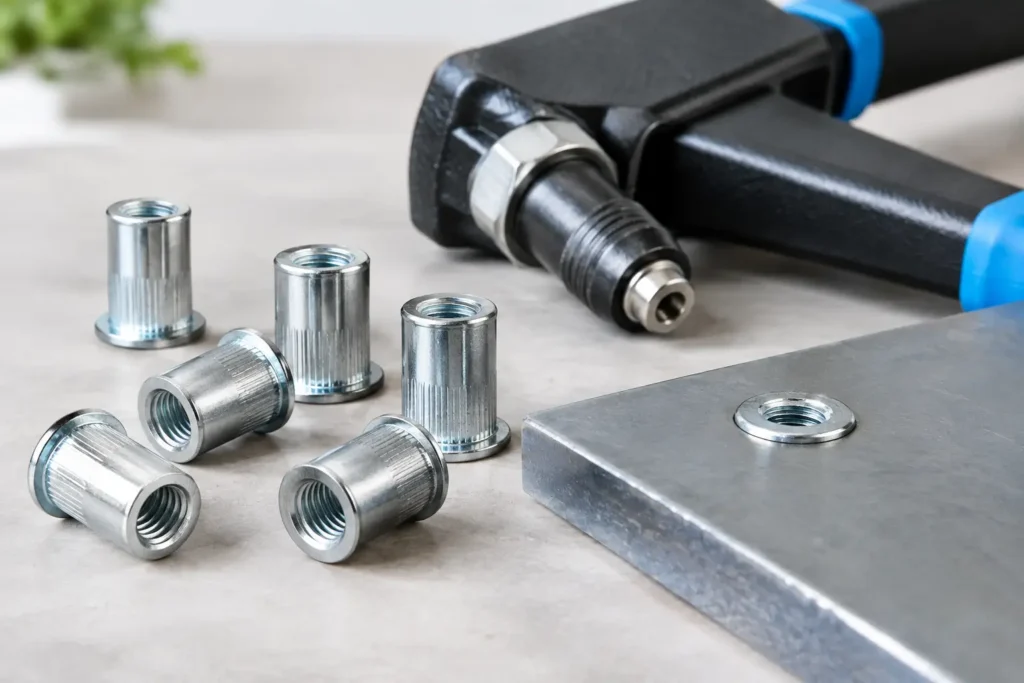
A rivet nut is a hollow, internally threaded sleeve. It is installed into a pre-drilled hole, then compressed with a rivet nut tool. As the tool pulls the threaded mandrel, the unthreaded body of the insert collapses on the far side of the panel. This forms a bulge that grips the material, leaving a permanent thread ready for a bolt.
The main advantage is access. You only need to reach the front of the panel. That makes rivet nuts useful for vehicle wings, van interiors, trailer bodies, steel cabinets, machine guards and box section where a conventional nut cannot be held behind the workpiece.
They are not a replacement for every welded fixing. A high-load suspension, recovery or structural mounting needs an engineered solution suited to the load and material. Rivet nuts are best for secure fastening of brackets, trims, guards, equipment mounts and light-to-medium-duty assemblies, provided the insert size and panel thickness are correctly matched.
US PRO 300 Piece Assorted Blind Threaded Steel Rivet Nuts M3 – M12
Choose the right rivet nut before drilling
The thread size is only one part of the specification. An M6 rivet nut may be right for a modest bracket, while M8 or M10 may suit heavier equipment, but larger is not automatically better. A bigger insert requires a larger hole and more surrounding material to resist pull-out or rotation.
Material choice matters too. Aluminium rivet nuts are easy to set and suit aluminium, plastic and lighter sheet applications. Steel inserts offer greater strength for everyday automotive and workshop work. Stainless steel rivet nuts resist corrosion but take more force to install, so use a tool designed to handle them rather than forcing a light-duty hand setter.
Also check the body style. A smooth body works well in many applications, but splined or knurled bodies give better resistance to spinning in softer material or high-vibration installations. Large-flange types spread the load across a wider area, which can help with thin sheet, fibreglass or plastic panels. Countersunk flange inserts are useful where the finished surface must sit flush, although the countersink must be cut accurately.
Most importantly, match the grip range to the panel thickness. Grip range is the material thickness an insert can clamp correctly. If the rivet nut is too short, it may not form a proper bulge. If it is too long, it can crush or distort thin sheet rather than tighten cleanly. Measure the combined thickness of every layer being clamped, including brackets and reinforcing plates where applicable.
110 Piece Threaded Nut Hand Riveter M3, M4, M5, M6, M8 For Aluminium & Steel Threaded Rivet Nuts
Tools needed to install rivet nuts
For occasional M4 to M6 jobs, a basic hand rivet nut tool can be good value. For repeated workshop use, larger threads or steel and stainless inserts, a lever-type, air-powered or battery-powered setting tool reduces effort and gives more consistent results. A proper tool is worth having when you are fitting dozens of inserts – uneven settings waste inserts and slow the job down.
You will also need a drill, sharp drill bits, the correct mandrel and nosepiece for the insert thread, a spanner for adjustment, a deburring tool or countersink, and eye protection. Use a centre punch before drilling steel or aluminium sheet to stop the bit wandering. For vehicle work, check behind the panel first for wiring, fuel lines, brake pipes, glass and trim.
Do not guess the hole size. Every rivet nut size and body type has a recommended hole diameter from its manufacturer. An M6 insert, for example, is commonly fitted into a hole around 9 mm, but this is not universal. Confirm the specification on the box or product details, then measure the drilled hole if the fit feels loose.
158 Piece Steel Flange Head Rivet Nut Set | M3, M4, M5, M8, M10 & M12
How to use rivet nuts step by step
Mark, drill and prepare the hole
Mark the fixing point carefully and centre punch it. Drill a small pilot hole first, especially in steel, then open it to the specified final diameter. Keep the drill square to the panel. A tilted hole produces a tilted insert, and that can make brackets difficult to align later.
Remove burrs from both sides of the hole. This is a small job with a big effect: burrs prevent the flange from sitting flat and can create a false impression that the insert is fully set. If you are working on bare steel that may be exposed to moisture, protect the drilled edge with a suitable primer or corrosion treatment before fitting the insert.
Test-fit the rivet nut by hand. It should slide into the hole with light resistance, sit squarely and not rattle. Do not hammer it in. If it will not enter, inspect for burrs and confirm the hole diameter. If it drops in with obvious side-to-side movement, stop and correct the hole or use the appropriate larger-body insert if the application allows.
Fit the insert to the setting tool
Select the mandrel that matches the rivet nut thread exactly. Thread the insert fully onto the mandrel by hand until its flange contacts the nosepiece. Cross-threading at this stage damages both the insert and the tool, so never start it at an angle.
Set the tool stroke or nosepiece position according to the tool instructions. The aim is to pull the insert enough to form a firm rear bulge without over-compressing it. Different materials and grip ranges require different settings. Make a test installation in matching offcuts whenever the finish, load or panel material matters.
Set the rivet nut squarely
Push the rivet nut into the prepared hole until the flange sits flat against the panel. Hold the tool at 90 degrees to the surface and keep steady pressure towards the panel as you operate the handles, trigger or lever.
With a hand tool, close the handles smoothly until resistance rises and the insert has collapsed behind the material. Do not use sudden force or keep pulling blindly after the insert has set. With pneumatic or battery tools, use the recommended setting force or stroke and let the tool complete its cycle.
Unscrew or release the mandrel carefully. The insert should remain fixed in the panel, with its flange flush and the internal thread clean. Thread a bolt in by hand before fitting the final component. It should engage smoothly without wobble or excessive resistance.
Check the fixing before loading it
A correctly fitted rivet nut does not turn when you tighten a bolt and does not pull away from the panel under normal hand pressure. Look at the rear side where possible. The collapsed section should be even and firmly clamped, not cracked, twisted or only partly formed.
Use the correct bolt length. A bolt that bottoms out inside the insert before clamping the bracket can feel tight while leaving the assembly loose. Conversely, a bolt that is too long may protrude into a cavity and foul wiring, moving parts or body panels. Add a washer where the bracket slot or material calls for it, and tighten to a sensible torque for the bolt size and application.
For parts exposed to vibration, such as vehicle-mounted toolboxes, brackets and accessories, use an appropriate thread-locking method if the assembly specification requires it. The rivet nut creates the thread; it does not stop the bolt from vibrating loose on its own.
Common rivet nut problems and how to avoid them
The most common failure is spinning. This usually comes from an oversized hole, a smooth-body insert in soft material, or insufficient setting force. A splined or knurled insert can improve grip, but it cannot compensate for a badly oversized hole. If an insert spins, removal is normally the cleanest option. Drill the flange carefully, remove the body and install a correctly sized replacement.
Another issue is a loose insert that pulls out. This points to the wrong grip range, incomplete setting or weak panel material. Check that the insert has been compressed enough and that its specified grip range covers the material thickness. On thin or soft material, a larger flange or a backing plate may distribute the load better.
Stripped threads often happen when a bolt is started crooked, overtightened or repeatedly removed under heavy load. Start bolts by hand, use the correct pitch and avoid treating a small aluminium insert like a structural steel thread. If frequent removal is expected, choose a stronger insert material and consider a larger thread size only after confirming the panel can support it.
Painted panels can also cause trouble. Thick paint, underseal or powder coating beneath the flange may compress after installation and leave the insert less secure. Clean the seating area where needed, then protect exposed metal once the insert is fitted. On visible bodywork, use masking tape and a sharp bit to reduce paint chipping around the hole.
Where rivet nuts make workshop jobs easier
Rivet nuts are particularly useful when fitting number plate brackets, light bars, shelving, compressor mounts, internal van racking, battery boxes, guards and removable access panels. They also provide a tidy solution for replacing damaged captive nuts in non-structural locations, where access behind the panel is limited.
For garage work, keeping a selection of M4, M5, M6, M8 and M10 inserts in steel and aluminium covers many common jobs. Store each size with its matching mandrel and note the required hole diameter on the drawer or organiser. That prevents rushed measuring when a vehicle or machine is occupying the bay.
A rivet nut is a small fixing, but it rewards careful preparation. Drill accurately, match the grip range, use a capable setting tool and test the thread before the final assembly goes on. Do that, and you will have a strong, serviceable mounting point ready for the next repair or installation.
