






A seized wheel bearing can turn a straightforward repair into an expensive job when force is applied in the wrong place. Knowing how to use a bearing press properly lets you remove and fit bearings with controlled pressure, protecting the hub, housing, new bearing and yourself. It is the difference between a clean workshop repair and ordering replacement parts that should never have been damaged.
Start with the right press and tooling
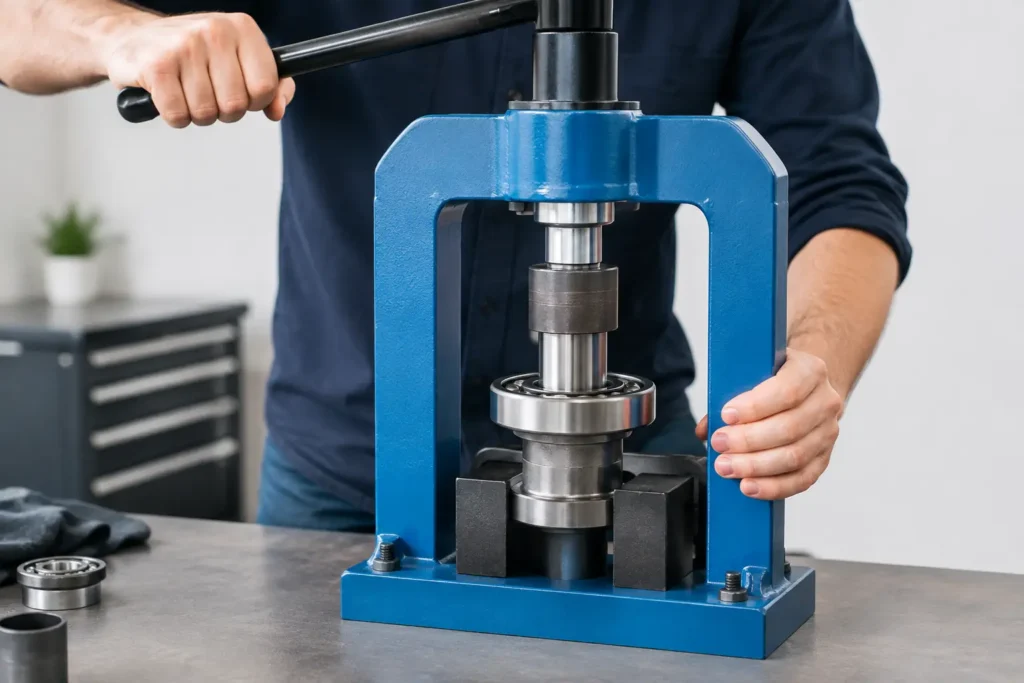
A bearing press may be a dedicated wheel-bearing kit, a manual screw-type press or a hydraulic workshop press with bearing separators, plates and drifts. All can do the job, but the best choice depends on where the bearing sits and whether the component can be removed from the vehicle.
A portable bearing press kit is useful for pressing wheel bearings in situ, particularly on suspension knuckles where removing the assembly would add labour. A hydraulic press is normally the stronger and more stable option for loose hubs, axle shafts, bushes and bearings removed from the vehicle. For regular garage work, a press with adequate bed width, adjustable height and a clear-rated capacity gives better value than forcing jobs through with improvised equipment.
Before starting, check the vehicle repair data. Some wheel bearings are retained by circlips, locking rings, staking or bolts. Many modern hub units are sealed assemblies and are bolted in rather than pressed. Applying press force to a unit that should be unbolted wastes time and can damage the knuckle.
You need clean, correctly sized press adapters. A good set should include receiving cups, pushing sleeves, threaded rods, thrust bearings and plates. Do not use a socket simply because it looks close enough. A socket can slip, crack under load or contact the bearing seal and cage instead of the race.
How to use a bearing press: prepare the component
Remove the component where practical and clean away rust, dirt and loose corrosion around the bearing bore. If working on a wheel hub or steering knuckle, remove the ABS sensor and shield where required. Pressing against a sensor ring or leaving a sensor exposed to heat, debris or an unstable part is an avoidable mistake.
Inspect the new bearing before it goes near the press. Confirm its outside diameter, width, orientation and any built-in magnetic encoder ring for ABS. On some bearings, the encoder side must face the sensor. It may look identical to the other side, so check the markings and the fitting instructions rather than guessing.
Support is as important as pressure. Set the hub, housing or knuckle squarely on the press bed or in the receiving cup. It must sit flat and remain stable throughout the operation. Never hold a component by hand while operating a hydraulic press. If it shifts, the press ram can launch the part, adapter or old bearing at speed.
Wear eye protection and keep your hands clear of the line of force. Gloves can help when handling sharp, dirty components, but they do not make an unstable pressing setup safe. Stand slightly to one side rather than directly in front of the workpiece.
Removing an old bearing without damaging the housing
The rule is simple: press on the part that is being removed, not through the parts you need to save. For a bearing pressed into a housing, support the housing and use a drift or sleeve that contacts the bearing’s outer race. The receiving space below must be large enough for the bearing to exit cleanly.
Apply pressure slowly. A properly supported bearing often releases with a sharp crack as corrosion gives way, then moves steadily. Stop immediately if the bearing starts to come out at an angle, the housing rocks, or the tool begins to deform. Release pressure, reset the component square and check that the adapter is still centred.
A badly corroded bearing may need penetrating fluid, careful heat applied to the outer housing, or a bearing separator. Heat expands the housing, not the bearing, so apply it only where appropriate and keep it away from seals, sensors and flammable cleaners. Do not heat a sealed bearing or use a flame near a vehicle component still carrying grease, fuel residue or brake fluid.
Sometimes the inner race stays on the hub after the bearing is pressed out. This is common and does not mean the hub is ruined. Use a bearing splitter and press, or carefully cut a relief groove in the race before splitting it, taking great care not to mark the hub journal. A gouged journal can prevent the new bearing from seating correctly.
Pressing in a new bearing correctly
Clean the bearing bore thoroughly with a wire brush, fine abrasive pad or suitable cleaning tool. Remove corrosion without removing metal. The bore should be dry, smooth and free from raised burrs. A light smear of suitable assembly lubricant can help where the manufacturer permits it, but do not coat an ABS encoder ring or pack the bore with grease.
Set the new bearing square to the bore. Start it by hand as far as it will go, keeping it level. Then choose a press sleeve that contacts only the outer race when fitting the bearing into a housing. This matters because pressing on the inner race transfers load through the balls or rollers, potentially brinelling the raceways before the vehicle has even left the ramp.
Pump the hydraulic press or tighten the screw press gradually, checking alignment after the first few millimetres. The bearing should enter evenly. If one side goes in first, stop and correct it. Trying to force a crooked bearing into place can score the bore, distort the bearing or crack an aluminium housing.
Press until the bearing is fully seated against its internal shoulder. If a circlip is fitted, clean the groove and install the circlip fully, ensuring it is seated all the way around. Do not rely on the pressure gauge alone to judge seating. The final position is set by the housing shoulder, circlip arrangement and manufacturer specification.
Fitting the hub through the bearing
This is where many new bearings are damaged. Once the bearing is installed in the knuckle, the hub must usually be pressed through the bearing’s inner race. Support the inner race from the opposite side with the correct-sized sleeve. Then press the hub into the bearing.
If you support the outer race while pushing the hub through, the force passes through the bearing internals. The inner race can be pulled apart from the bearing, leaving you with a damaged new part and another strip-down. Match the support point to the force path every time.
Common bearing press mistakes to avoid
Most press failures come from rushing the setup, not from lack of press capacity. Avoid these costly errors:
- Pressing on the wrong race and loading the bearing’s balls or rollers.
- Using sockets, loose blocks or damaged drifts as press adapters.
- Failing to remove a circlip, retainer or locking ring before applying force.
- Letting the workpiece sit at an angle on the press bed.
- Reusing a bearing that has been pressed out, dropped or pulled apart.
- Ignoring ABS encoder orientation and fitting the bearing the wrong way round.
Also consider load capacity realistically. A small manual kit is convenient, but it may not shift a heavily corroded commercial-vehicle bearing. A larger hydraulic press provides more force, yet more force is not a fix for poor support. If the component will not move under sensible pressure, stop and check for a hidden retainer, incorrect setup or corrosion that needs treatment.
Final checks before refitting
Turn the bearing by hand once fitted. It should rotate smoothly without grinding, tight spots or excessive play. Check that seals sit correctly and that any circlip is properly installed. On wheel-bearing work, inspect the hub face, ABS sensor, brake disc mounting surface and driveshaft splines before reassembly.
Use the vehicle manufacturer’s torque settings for hub nuts, driveshaft bolts and suspension fixings. A press installs the bearing, but correct final torque controls preload on many designs. Tightening an axle nut with an impact wrench and guessing the torque is not professional practice.
For workshops and serious DIY users, dependable press tooling earns its place quickly. Irish Tools Shop stocks affordable, reliable workshop equipment and bearing service tools suited to routine garage repairs. Buy the right adapters once, keep them clean and organised, and each bearing job becomes faster, safer and far less likely to come back.
