






A brake pedal can still feel firm while the fluid behind it is past its best. That is the problem with brake fluid: it degrades quietly, absorbs moisture over time and can lose boiling-point protection long before a driver notices a fault. Knowing how to test brake fluid gives a garage or capable DIY mechanic a quick way to spot a service item that should not be ignored.
Brake fluid testing is not a substitute for a full brake inspection. If there is a warning light, a soft pedal, a leak, uneven braking or a sudden change in pedal travel, take the vehicle out of service until the cause is found. Fluid condition is one part of a safe braking system, alongside pads, discs, hoses, calipers, pipes and correct bleeding.
Why brake fluid needs testing
Most passenger vehicles use glycol-based DOT 3, DOT 4 or DOT 5.1 brake fluid. These fluids are hygroscopic, meaning they draw moisture from the air. Moisture can enter through the reservoir vent, rubber hoses and normal workshop handling, even where there are no obvious leaks.
As water content rises, the fluid’s boiling point falls. Under repeated heavy braking, such as towing, descending steep roads, track use or hard motorway driving, overheated fluid can boil. Vapour compresses far more than liquid, which can leave the pedal long and ineffective when reliable braking matters most.
Water-contaminated fluid also encourages internal corrosion in brake pipes, master cylinders, ABS hydraulic units and calipers. Replacing fluid on schedule is generally far cheaper than replacing an ABS module or dealing with seized brake components. For working garages, a test result also gives customers a clear reason for recommended brake-fluid service rather than a vague upsell.
Check the vehicle specification first
Before opening the reservoir, confirm the fluid specification on the reservoir cap, handbook or workshop data. Use only the grade approved by the vehicle manufacturer. DOT 3, DOT 4 and DOT 5.1 are glycol-based and are generally compatible in an emergency, but mixing grades is not best practice when a specific fluid is required.
DOT 5 is silicone-based and must not be mixed with glycol fluids. It is uncommon on modern everyday vehicles but can be found in certain specialist applications. Never assume that a higher DOT number automatically makes a fluid suitable.
Also check the manufacturer’s replacement interval. Many vehicles call for brake-fluid replacement every two years, although intervals vary. A good test reading does not override a scheduled service requirement, particularly where warranty, fleet policy or manufacturer maintenance records apply.
How to test brake fluid with a visual inspection
Start with the simplest check. With the vehicle on level ground and the engine off, locate the brake-fluid reservoir. Clean loose dirt from around the cap first. Dirt dropped into the reservoir can cause damage and contamination, so use a clean cloth and do not leave the cap off longer than necessary.
Check the level against the MIN and MAX markings without removing the cap if the reservoir is translucent. A low level can simply reflect worn brake pads, because caliper pistons move outward as pads wear. However, a sudden or very low level must be investigated for leaks and excessive pad wear. Do not merely top it up and send the vehicle away.
Look at the fluid colour through the reservoir. Fresh glycol brake fluid is usually clear to pale amber. Dark brown or nearly black fluid is a strong sign that a fluid change is overdue. Cloudiness, visible particles, sludge or an oily appearance are more serious warnings. Contaminated fluid should be replaced, and the system should be inspected for the source of contamination.
Colour is only a screening check. Some fluid darkens with age but remains within an acceptable moisture range, while fluid that looks reasonably clean can still hold enough water to compromise its boiling point. Use a proper tester before deciding the service work.
Testing brake fluid with an electronic moisture tester
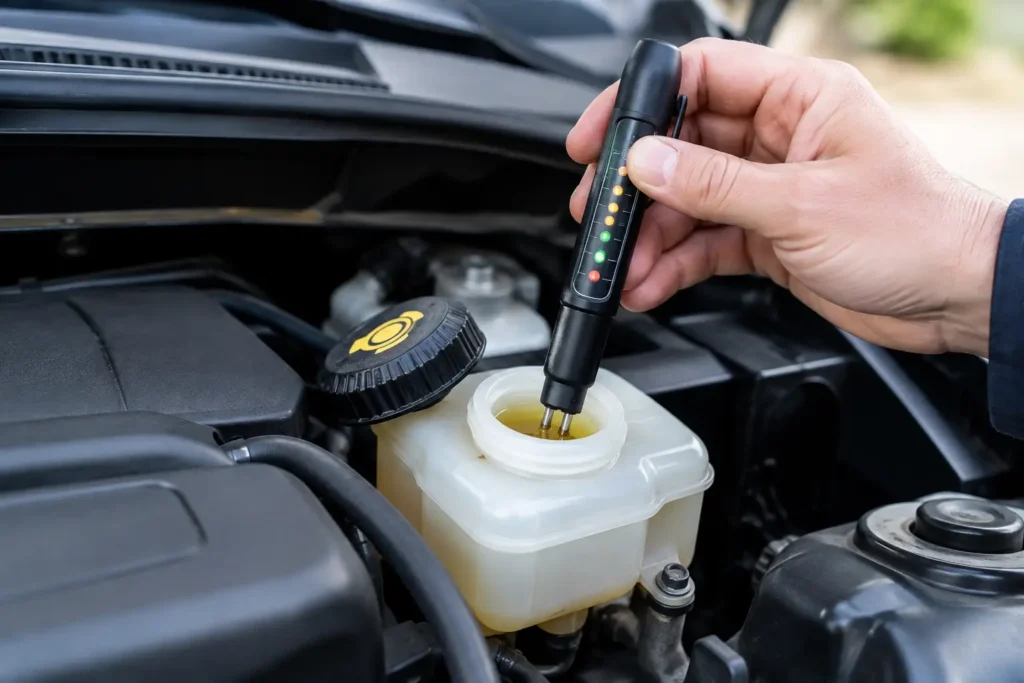
A handheld electronic brake-fluid tester is the quickest workshop method. Most use a probe to estimate water content through electrical conductivity. They are affordable, fast and useful for checking several vehicles during routine servicing.
To get a meaningful result, use a clean tester designed for the type of glycol brake fluid being checked. Wipe the probe before use, remove the reservoir cap carefully and lower the probe into the fluid without touching the bottom of the reservoir. Keep the sensor clear of sediment, then wait for the reading or indicator lights to settle.
Many testers use a green, amber and red display rather than a precise percentage. As a broad guide, less than 1% moisture is usually good, around 1% to 2% deserves monitoring against the service interval, and readings over 3% normally justify replacement. Follow the tester manufacturer’s instructions, as thresholds and accuracy vary.
Electronic testers are convenient, but they are not infallible. Conductivity can be affected by fluid formulation, dissolved metals and contamination. A cheap tester should be treated as a useful service tool, not the final word where a result is borderline or the vehicle has been used hard. For a more defensible diagnosis, use a boiling-point tester.
Use a boiling-point tester for a stronger result
A brake-fluid boiling-point tester heats a small sample and measures its actual boiling point. This approach is closer to the real risk because boiling point, rather than moisture percentage alone, determines how well the fluid resists vapour lock under heat.
Draw a small fluid sample from the reservoir with clean equipment, following the tester instructions. Do not return a tested sample to the braking system. The instrument heats the sample and reports its boiling point, allowing it to be compared with the vehicle fluid specification and workshop replacement limits.
For professional workshops, this test is particularly useful on performance cars, commercial vehicles, vehicles used for towing, and any job where the customer needs clear evidence for a brake-fluid recommendation. It also avoids relying solely on fluid colour or a generic LED tester.
There is a trade-off. Boiling-point testers cost more than basic probe testers and require careful handling because they heat fluid. For regular service work, though, they can save time in disputes and support a more accurate maintenance decision.
When the fluid should be replaced
Replace brake fluid if the manufacturer interval has been reached, the test result exceeds the tester’s replacement threshold, or the fluid is visibly contaminated. Replace it after brake-system repairs where fluid has been lost or contamination is possible. If the reservoir has been opened during a dusty repair, inspect the fluid carefully rather than assuming it remains clean.
A brake-fluid change should be a complete flush, not just removing fluid from the reservoir and adding fresh fluid. Old fluid remains in the pipes, flexible hoses, calipers, wheel cylinders and ABS hydraulic unit. Bleed fresh, correct-specification fluid through each circuit until it runs clean and free from air.
The correct bleeding sequence depends on the vehicle. Some ABS-equipped vehicles need a diagnostic tool to cycle valves or run an automated bleed procedure. On these systems, guessing can leave trapped air and a poor pedal. Follow the manufacturer procedure, use a quality pressure bleeder where appropriate, and keep the reservoir from running dry throughout the job.
Brake fluid damages paintwork, so protect painted panels and wipe spills immediately with plenty of water. Wear gloves and eye protection, and dispose of waste fluid through an approved recycling route. It is not an oil substitute and should never be tipped into drains or mixed with used engine oil.
Tools that make the job quicker
For basic condition checks, a reliable electronic brake-fluid tester and a clean lint-free cloth are enough. For a more accurate workshop assessment, add a boiling-point tester. When replacement is required, a pressure brake bleeder, correct brake fluid, suitable spanners for bleed nipples, catch bottles and protective equipment make the work cleaner and more controlled.
Do not save money by buying fluid with an uncertain specification or using an old, already-open bottle from the back of the garage. Glycol fluid absorbs moisture after opening too. Buy the correct grade, keep the container sealed until needed and use it within the supplier’s stated storage guidance.
Irish Tools Shop stocks practical brake service equipment for garages and serious DIY users who need dependable kit without inflated workshop pricing. Choose tools that suit the volume of work, keep test equipment clean and replace doubtful consumables before they create a bigger repair bill.
A two-minute fluid test during routine servicing can prevent an awkward conversation after a long pedal appears under load. Check the specification, test with the right method and, where the result is questionable, replace the fluid properly rather than taking chances with the one system every vehicle needs to work first time.
